

Soft, cake-like red velvet cookies dipped in rich white chocolate and decorated to look like scary cool eyeballs!

Halloween is inching closer, which means it’s time to scour the Pinternet for all those fun and ghoulishly good treats to serve at your Halloween party! In fact, I’ve got the perfect Halloween treat right here…

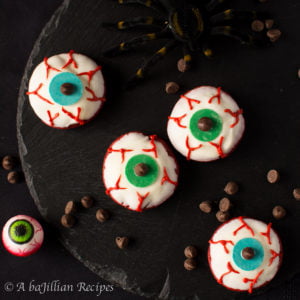
These Red Velvet “Eyeball” Cookies are not only amusing to look at, but they taste delicious! That is, of course, once you can get past the gross factor of biting into what looks like a veiny eyeball that’s blood red on the inside.

Thanks to the fact that these red velvet cookies are made with cake mix along with a few other ingredients, these “eyeballs” actually come together pretty quickly! And before you turn your nose up at the cake mix part, I HIGHLY recommend you give these cookies a try. They’re soft and super thick, yet slightly chewy, and they have that perfect red velvet flavor balance of vanilla and cocoa. Plus, you don’t have to use up an entire bottle of red food coloring, nor do you have to risk getting red food coloring all over yourself…

Aside from the cake mix, you only need three other ingredients–vegetable oil, eggs, and cream cheese. Oil and eggs are usually standard ingredients for a cake mix, but I decided to incorporate a little cream cheese into the dough for extra richness and chew. Furthermore, you can’t have red velvet without at least a little cream cheese in there somewhere!

Once scooped out onto the baking sheet, these cookies go in for about 10-12 minutes, or until puffed and springy when touched. With most cookie recipes, I usually prefer to under-bake because it results in a softer, doughier cookie. However, since these cookies are made with cake mix, you’ll want to make sure that they’re fully baked so that they don’t collapse as they cool. I took my first batch of cookies out of the oven too early and they became more crinkly rather than domed. I found that 12 minutes was the perfect amount of time to create a nicely domed cookie that was still super moist on the inside. If you do end up with crinkly cookies, no worries, just dip them in a second layer of white chocolate to even out the crevices! Speaking of….
Once the cookies have cooled completely, it’s time for the REAL fun to begin–making them into EYEBALLS!!! It’s really not as intimidating or time-consuming as it might seem. All you have to do is dip the top of the cookie into melted white chocolate, press a blue/green (or any color iris you like) candy melt onto the center of the cookie, then use a tiny dab of white chocolate to glue a chocolate chip onto the center of the “iris”. Once the white chocolate has set, you can pipe on the “veins”, which is really just melted red candy melts. To me, the veins are what pull everything together to make it look like an actual eyeball.

Soft, chewy, and all out spooky, these Red Velvet Eyeball Cookies are guaranteed to amuse everyone at your Halloween party this year!

Red Velvet “Eyeball” Cookies
Ingredients
Red Velvet Cookies:
- 1 (15.25 oz) box red velvet cake mix
- 2 eggs
- ¼ cup vegetable oil
- 2 Tablespoons cream cheese
For Decorating:
- 8 ounces white chocolate
- 1 Tablespoon coconut oil
- Red candy melts
- Green/Blue candy melts (any color will work)
- Semi-sweet chocolate chips
Instructions
- Preheat the oven to 350ºF, and line a baking sheet with parchment paper.
- In the bowl of a stand mixer fitted with the paddle attachment, beat the cake mix, eggs, vegetable oil and cream cheese together until combined. Scoop dough out onto baking sheet.
- Bake for 10-12 minutes, or until puffed and springy to the touch. Allow to cool on the baking sheet for 5 minutes before transferring to a wire rack to cool completely.
- In a microwave-safe bowl, heat the white chocolate and coconut oil in the microwave until smooth and melted.
- Working one at a time, dip the top (domed side) of the red velvet cookie into the white chocolate, then place back onto the wire rack. Immediately press a green/blue candy melt onto the center of the cookie (flat side up). Put a tiny dab of white chocolate onto the bottom-side of a chocolate chip, then place onto the center of the green/blue candy melt. Repeat with the remaining cookies.
- Once the chocolate has set, melt the red candy melts in the microwave, then transfer to a pastry bag fitted with a small round tip, or a ziplock bag with the very tip of the corner cut off. Pipe the melted red candy melts/”veins” onto the white part of the “eyeball”. Repeat with the remaining cookies, then refrigerate cookies until chocolate is set.