

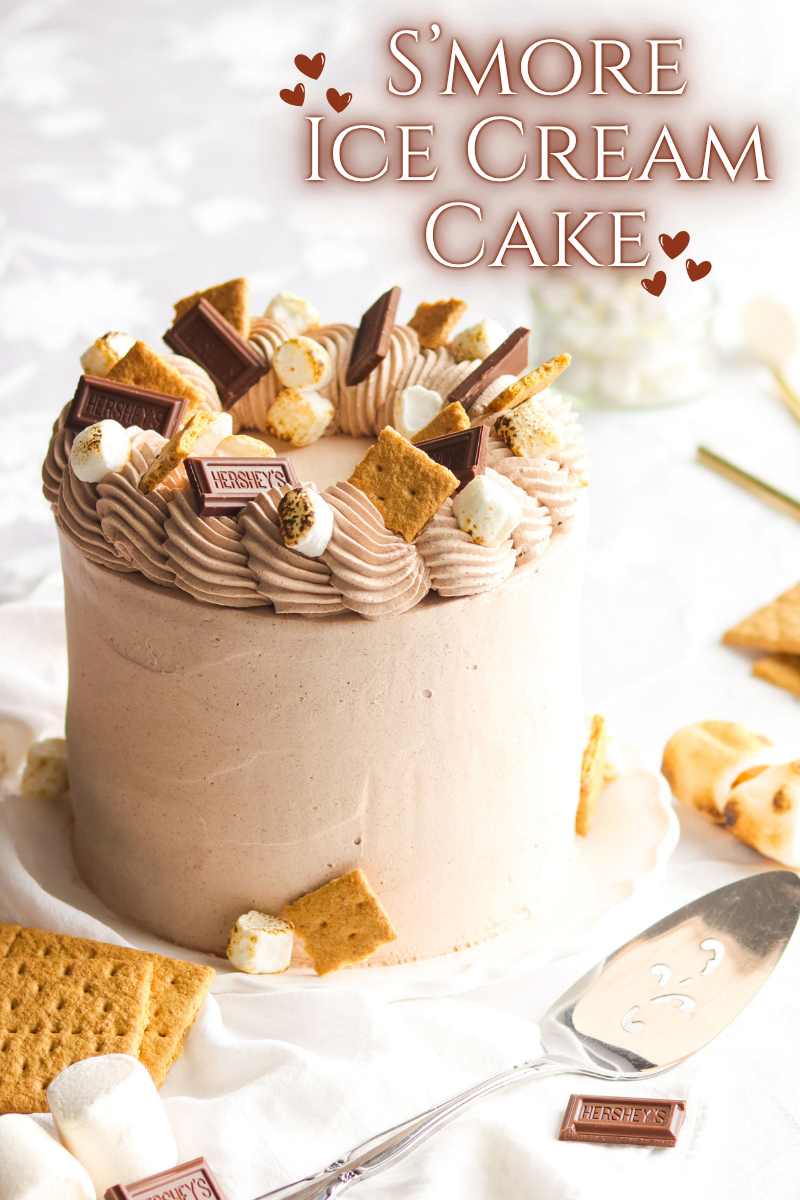
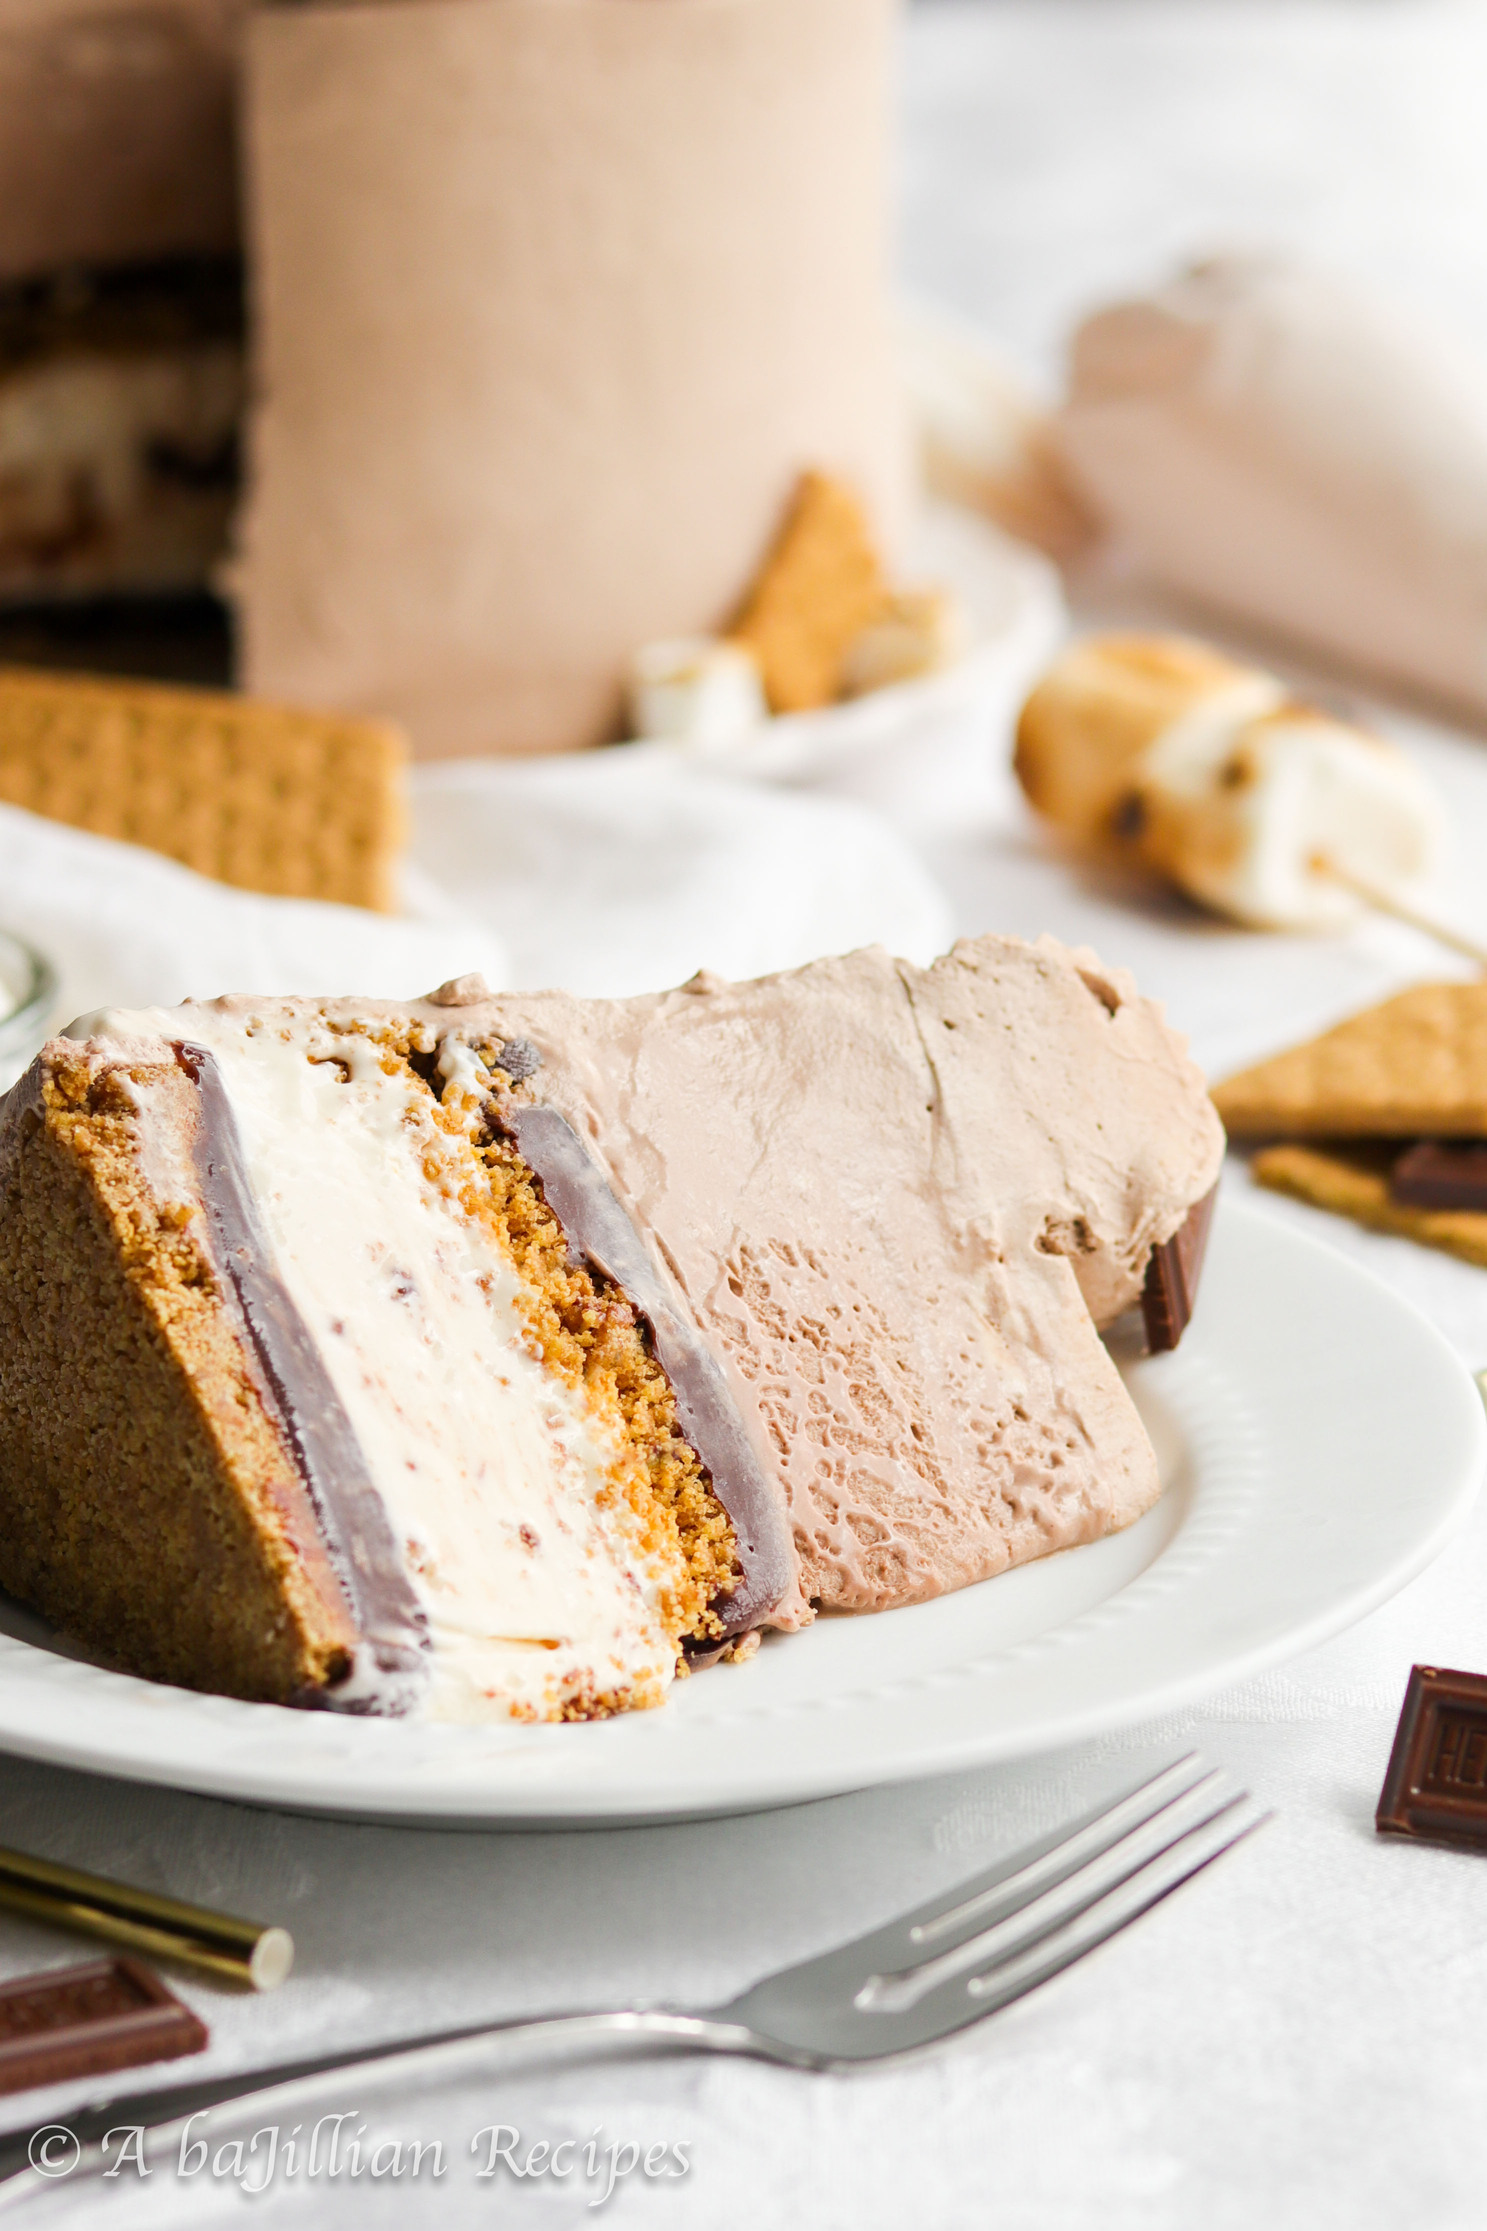
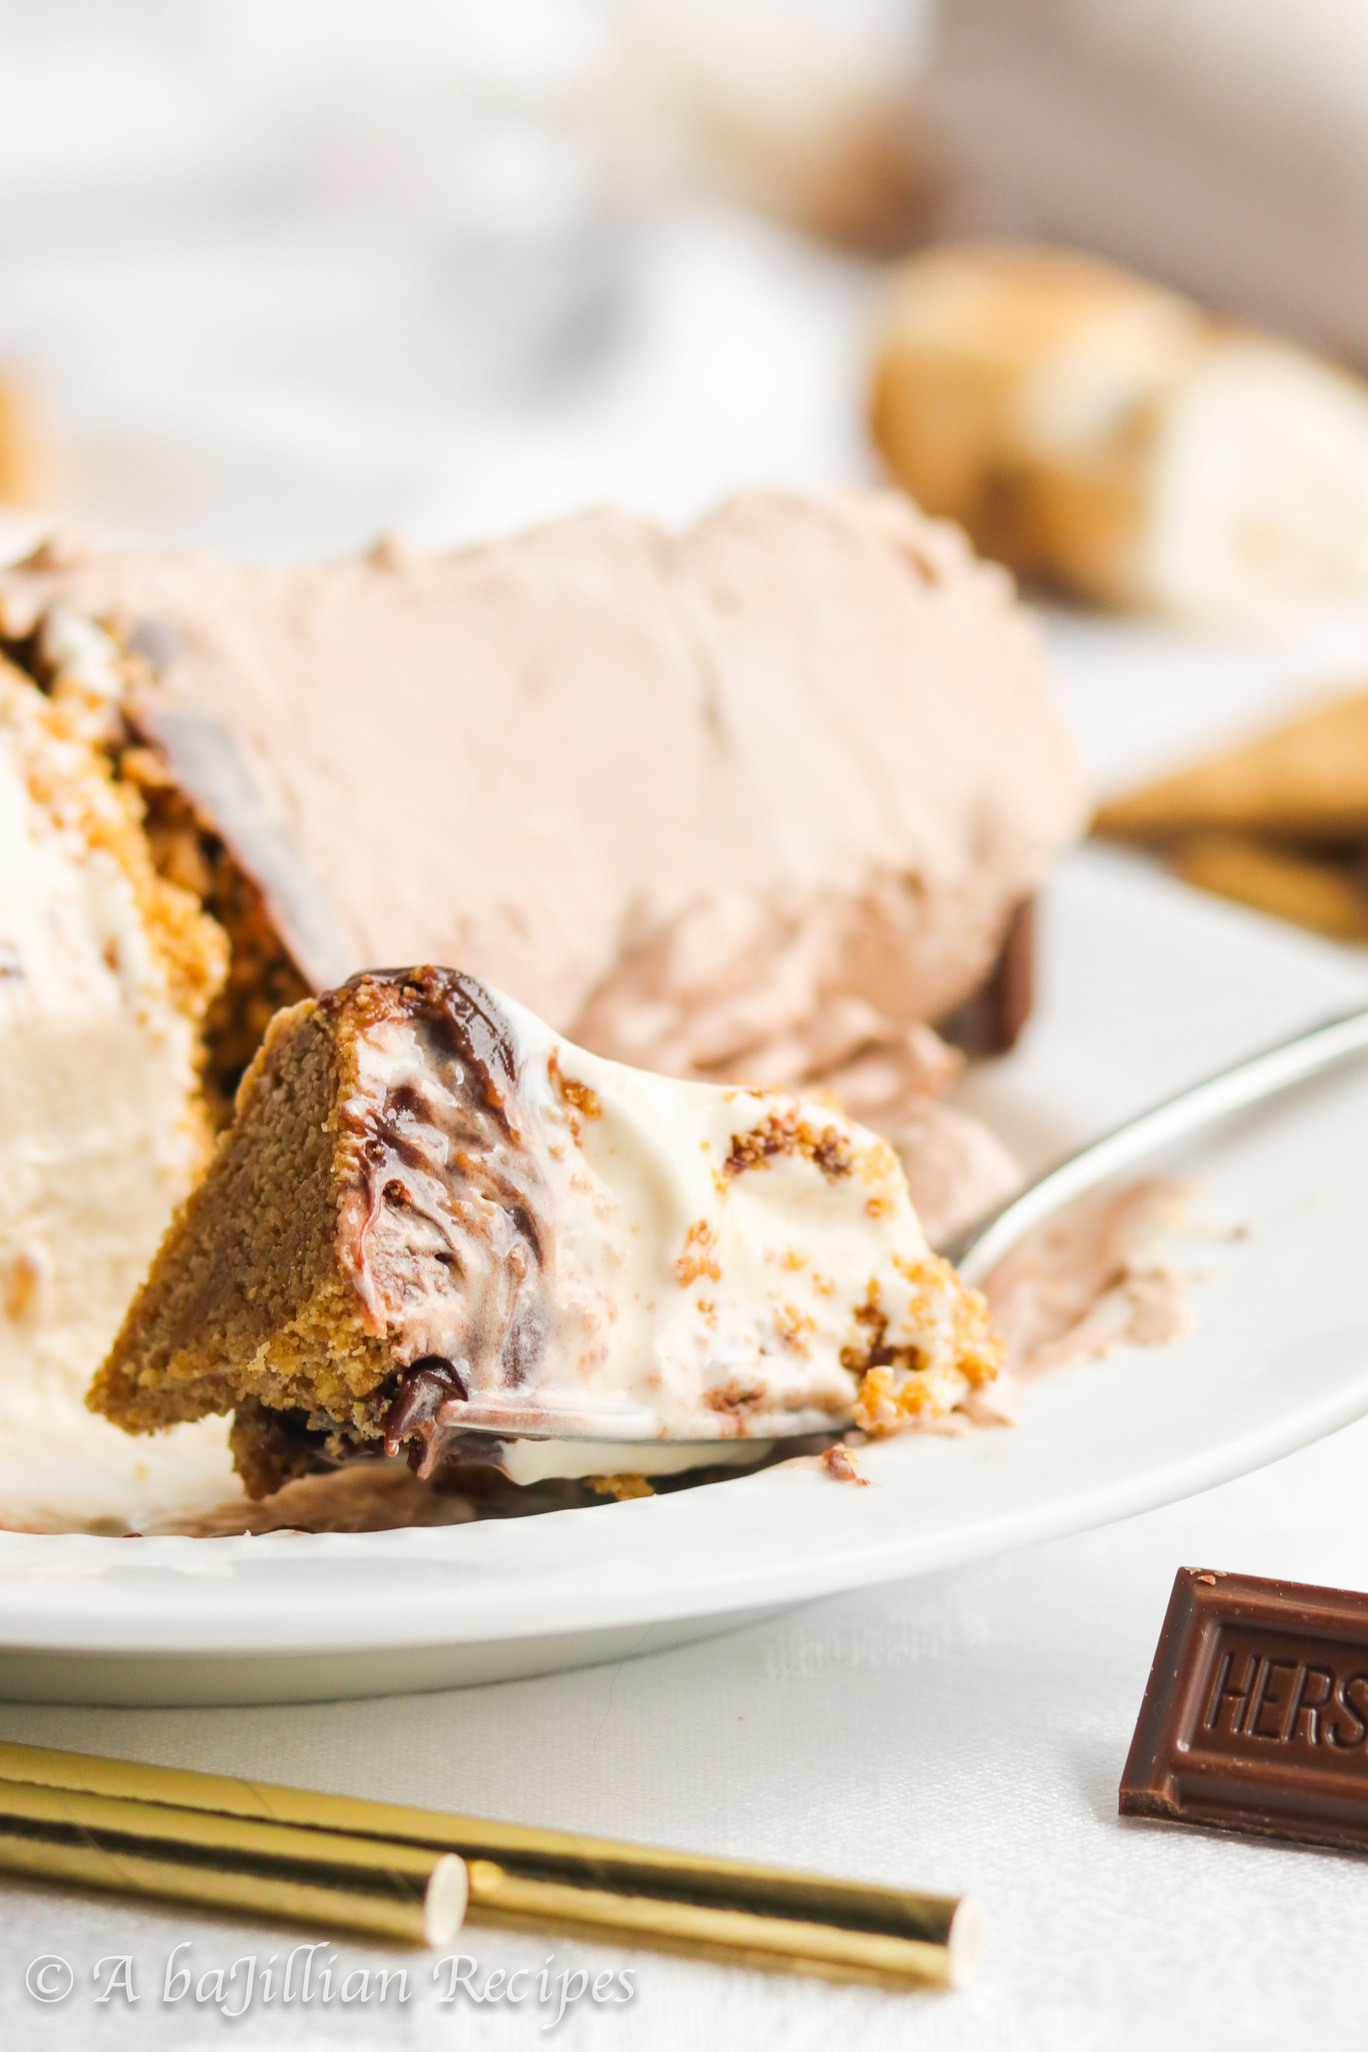
This S’more Ice Cream Cake features layers of creamy chocolate ice cream, toasted marshmallow ice cream, rich fudge sauce, and crisp graham cracker crust!
Summer has officially started (according to Earth’s tilt), and if there’s a treat I look forward to most this time of year, it’s definitely the s’more.
S’mores truly have the perfect combination of flavors and textures–crispy graham crackers, rich and melty milk chocolate, gooey toasted marshmallows…what more could you ask for??
So in honor of my favorite campfire treat, I decided to make something that incorporates all of the delectable elements we all love about the s’more.
Everything You’ll Love About This S’more Ice Cream Cake
Buttery Graham Cracker Crust: Just like the classic s’more, you get two crispy crunchy layers of graham cracker, but in crust form. Tossed with brown sugar, butter, and a dash of cinnamon, the graham cracker crust adds the perfect crunch to this cake.
TOASTED Marshmallow Ice Cream: That’s right, I said TOASTED! Because a s’more is not truly a s’more if it doesn’t contain a perfectly toasted (or burnt AF) marshmallow. This no-churn ice cream is infused with toasted marshmallows, giving it that nostalgic toasted flavor.
Creamy Milk Chocolate Ice Cream: Just like the toasted marshmallow ice cream, this ice cream is no-churn, making it incredibly creamy. Made with both melted milk chocolate and cocoa powder, this ice cream contains a double dose of chocolate!
Homemade Fudge Sauce: In case the chocolate ice cream wasn’t enough, I added yet ANOTHER layer of chocolate by making up the most smooth and velvety fudge sauce. Made with just a few simple ingredients, this fudge sauce is embarrassingly easy to make and it is beyond divine.
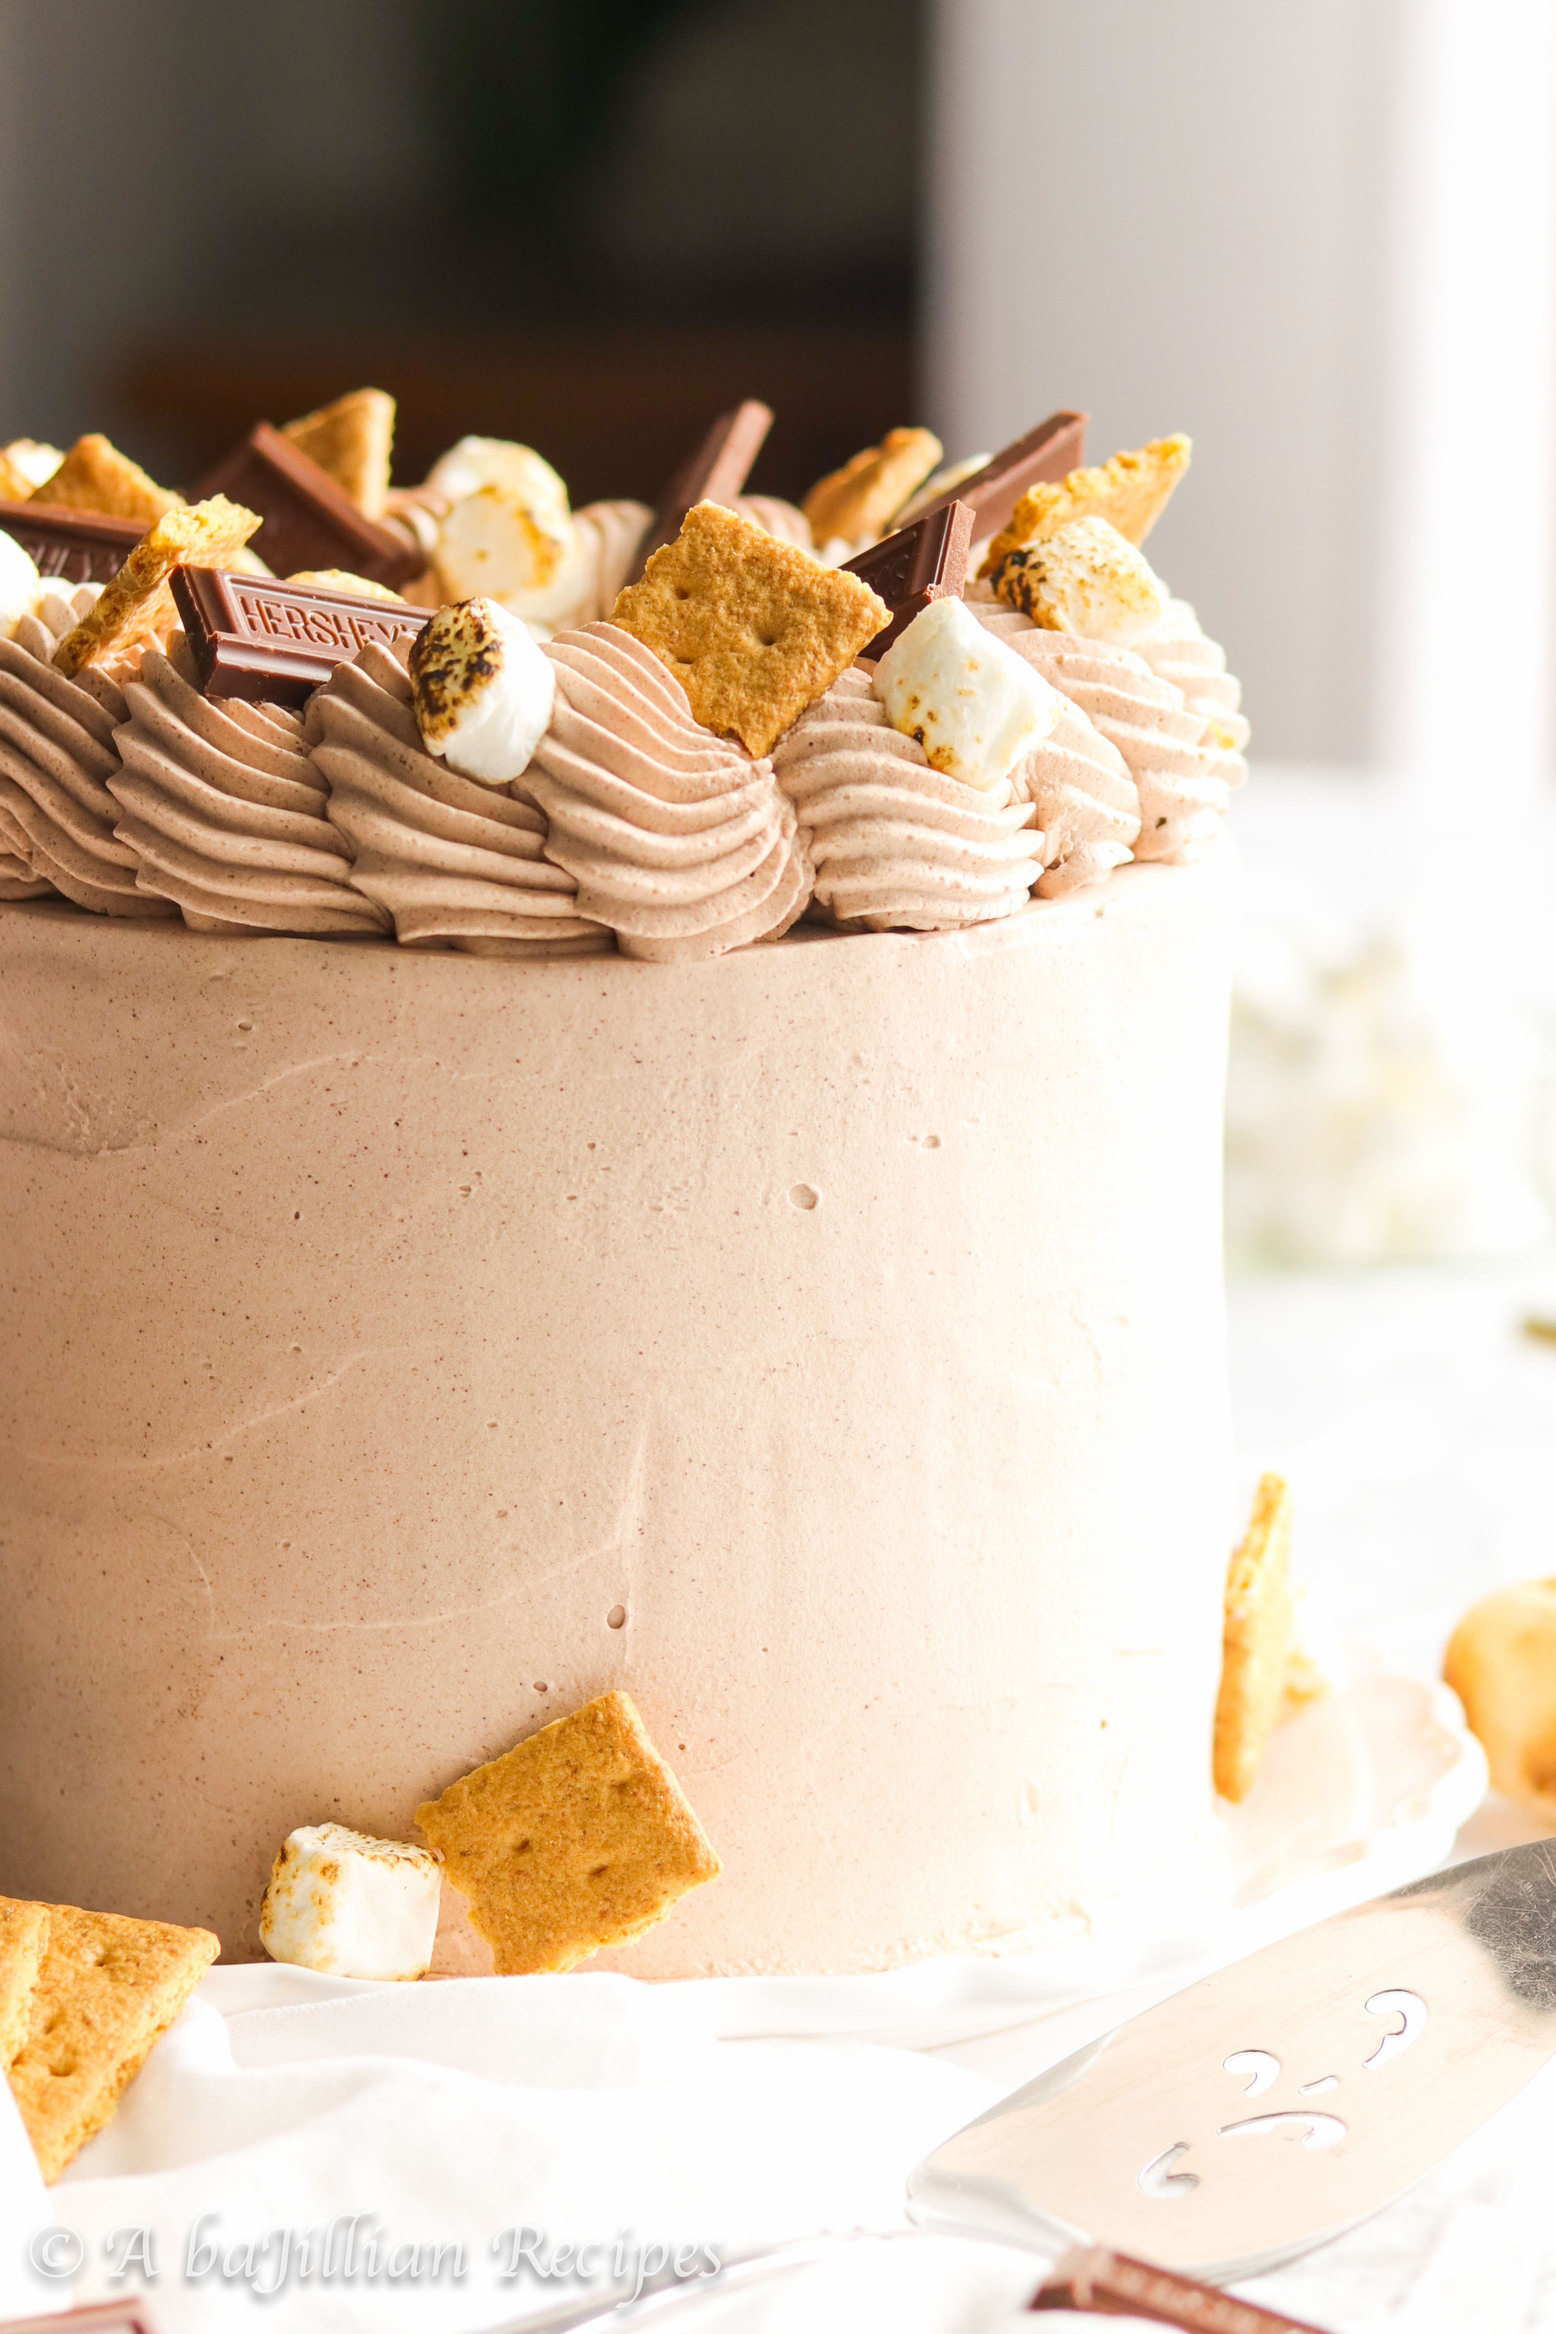
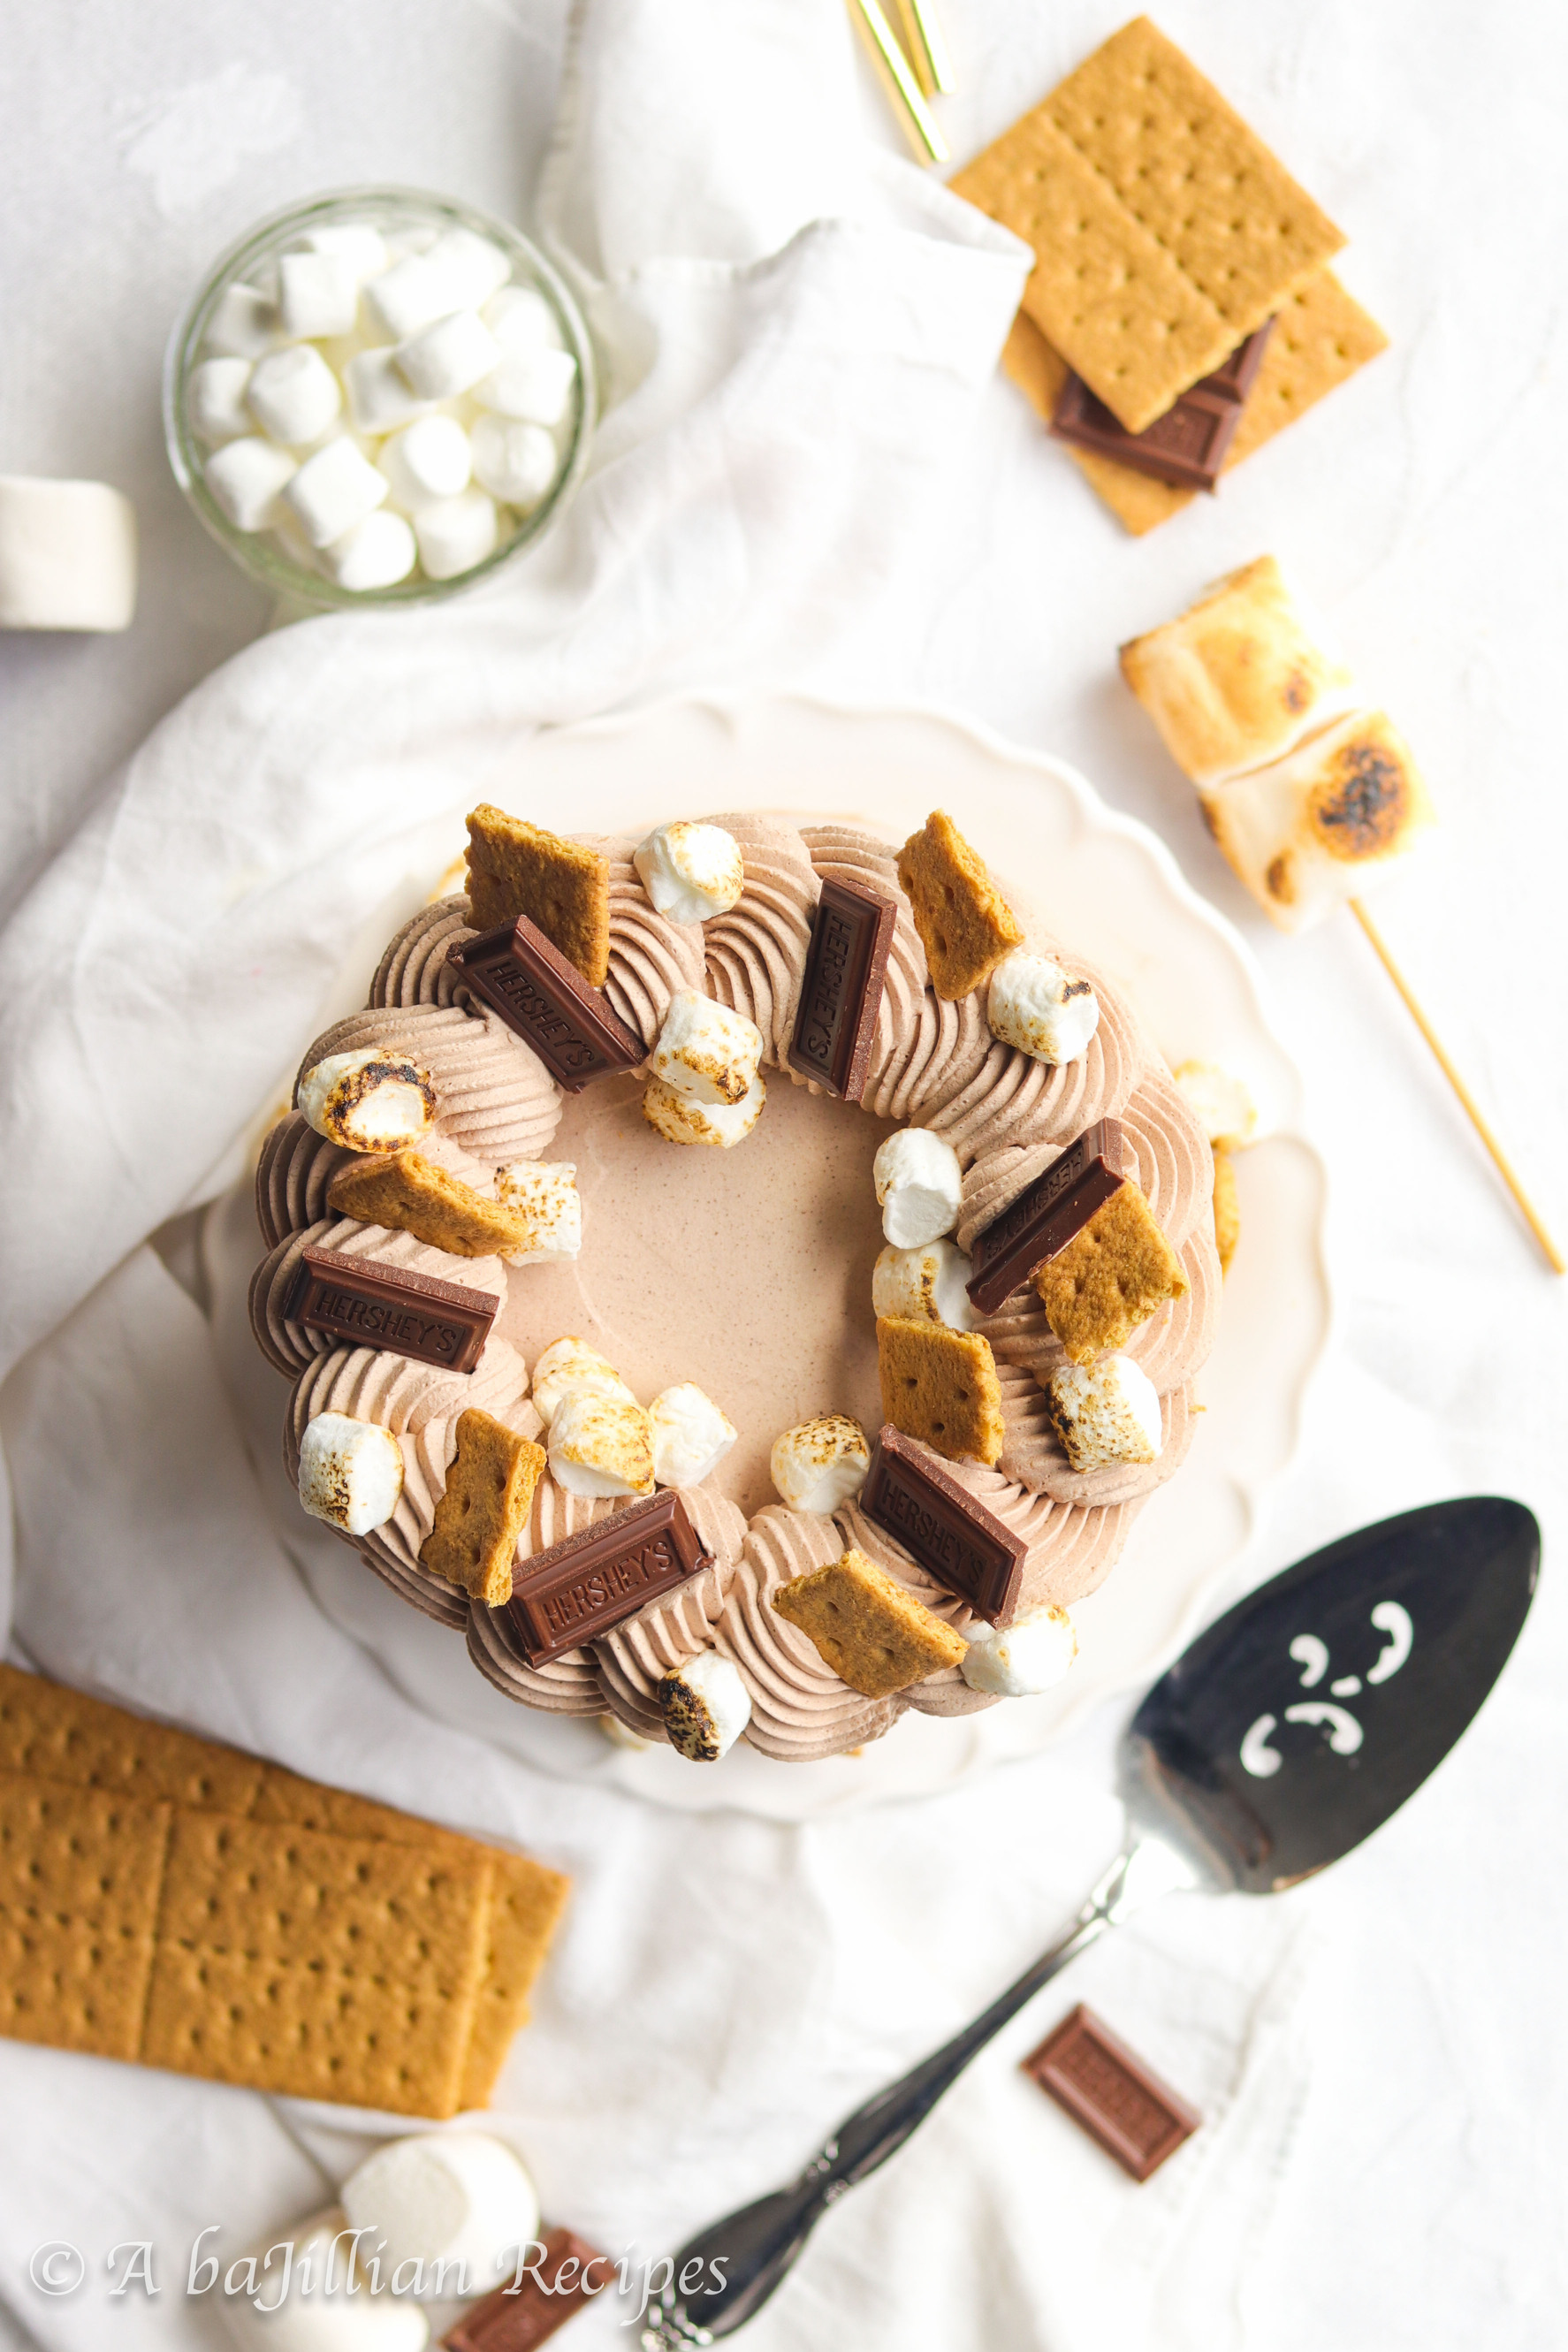
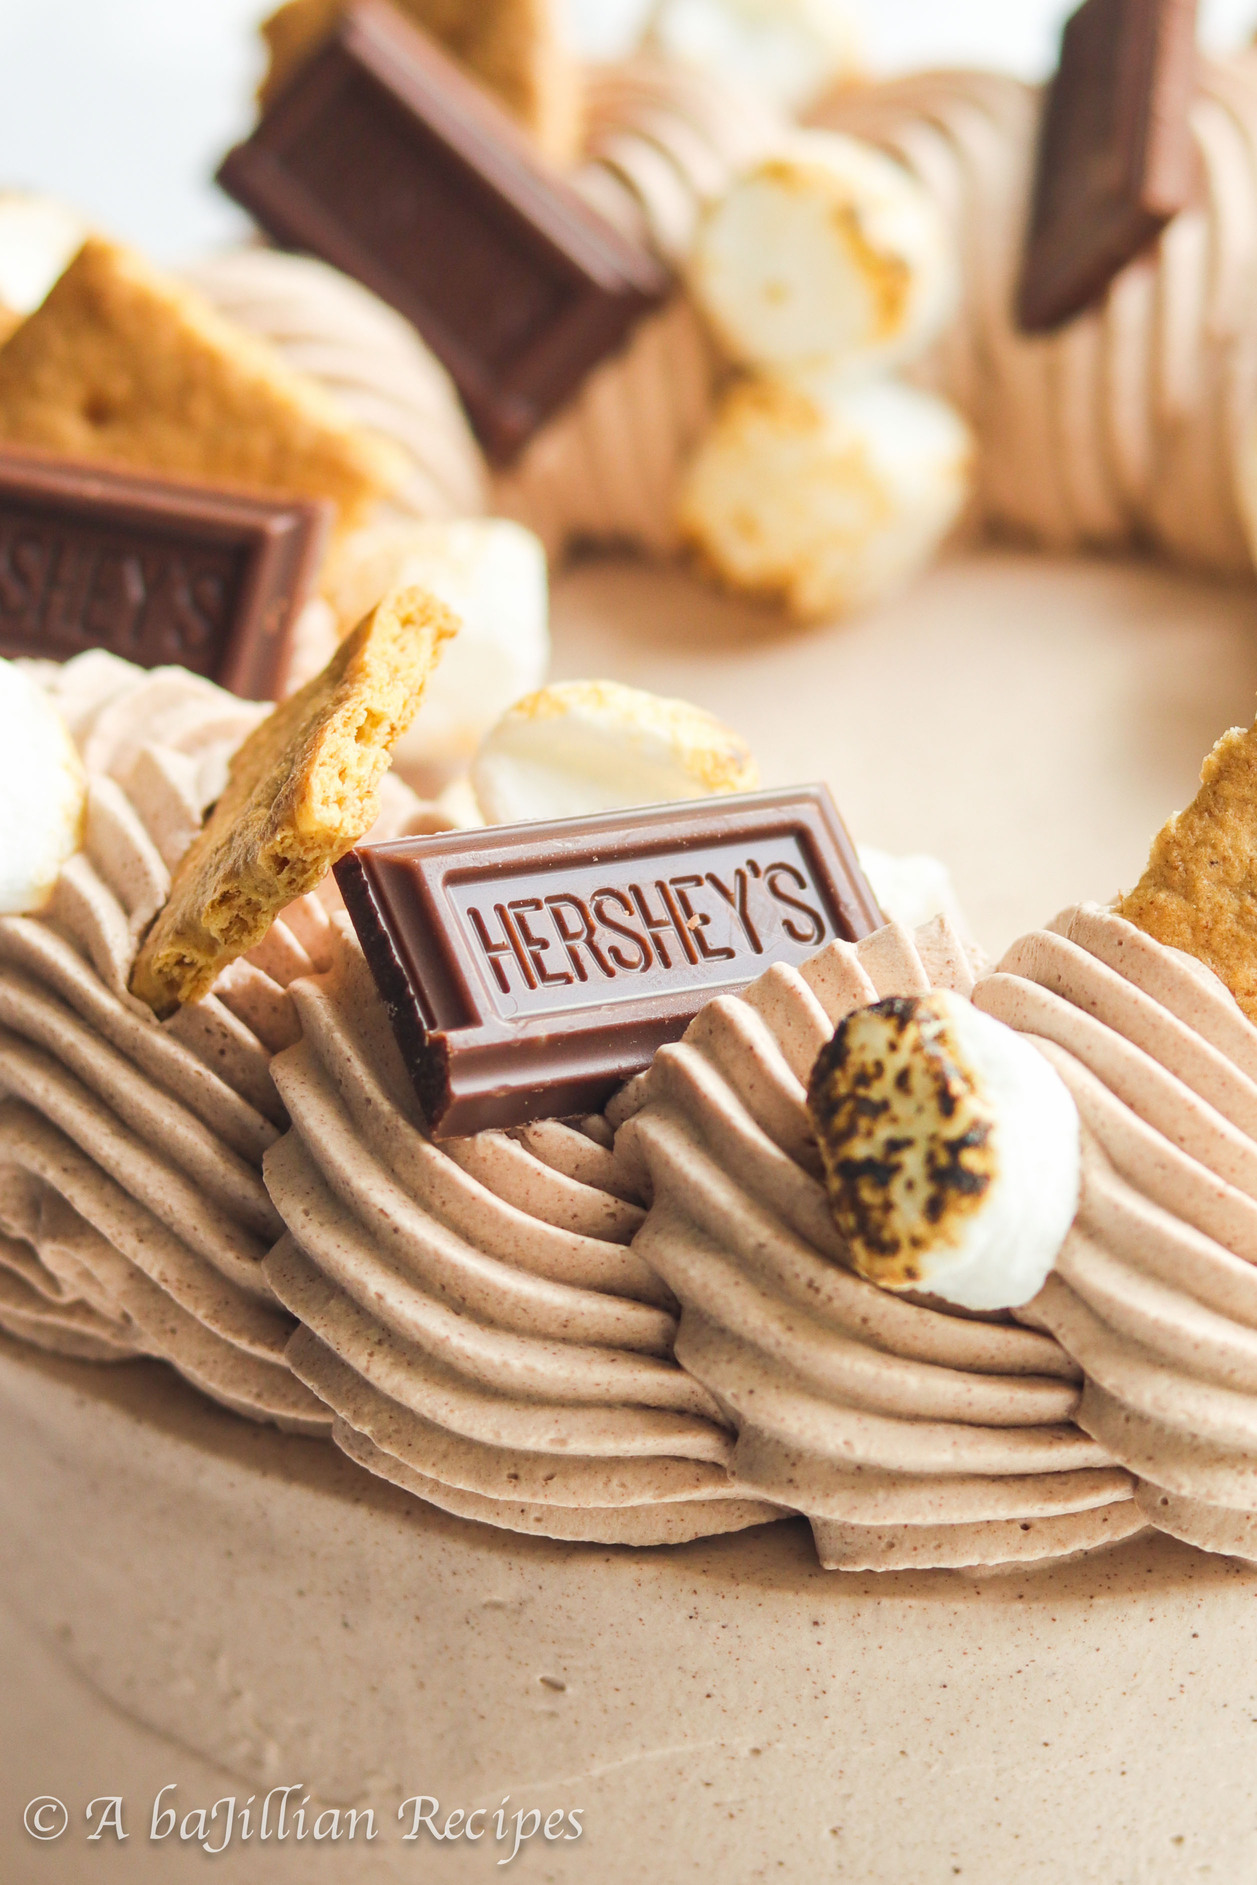
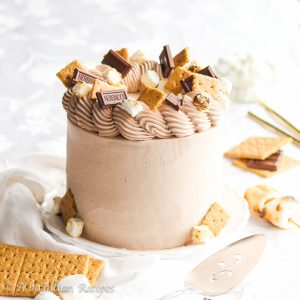
Chocolate Whipped Cream Frosting: To create that smooth and pristine finish, the entire cake is cloaked in fluffy chocolate whipped cream frosting. Can you say heavenly?
S’more Ice Cream Cake Tips
NEVER Leave the Broiler: When toasting your marshmallows under the broiler, make sure to keep a close eye on them. It’s only a matter of seconds before your marshmallows go from golden brown to black and burnt. If you’re afraid of burning the marshmallows, you can toast them slowly by preheating the oven to 400ºF, and toasting the marshmallows for 3-5 minutes.
Use a Food Processor or Blender: When making the toasted marshmallow ice cream, your best friend is either a food processor or a blender. Due to the stickiness of marshmallows, it can be a struggle mixing them into the sweetened condensed milk, so a food processor helps A LOT. If you don’t have either appliance, microwaving the toasted marshmallow-sweetened condensed milk for 10-15 seconds will help loosen it up, making it easier to mix.
Line the Cake Pans with Plastic Wrap: For easy peasy removal, make sure to line your cake pans with plastic wrap. This allows you to easily lift the ice cream cake layers out of the pan once they’ve chilled for several hours in the freezer.
Use a Deep Cake Pan: Since this is a rather tall ice cream cake, you’ll need at least two 6-inch cake pans, depending on their depths. I used a springform pan that was 3 inches deep and another regular cake pan that was about 2 inches in depth. Since you’ll be lining the cake pans with plastic wrap, you don’t necessarily have to use springform pans.
ALWAYS Sift the Cocoa Powder First: Cocoa powder has the tendency to clump up, which can result in a speckled appearance in the chocolate whipped cream. To prevent this, be sure to sift the cocoa powder into the powdered sugar, then use a fork to stir everything together. When it’s added to the whipped cream, it’ll incorporate much better and you won’t end up with those pesky brown specks.
Two Coats of Whipped Cream Frosting: Similar to how I frost regular cakes, I like to do a double coat of frosting on ice cream cakes. The first coat of frosting acts as a crumb coat, so it doesn’t have to be perfect. Try to create a smooth appearance, but don’t worry if there are a few crumbs peaking out. They’ll be covered with the second coat of frosting. After at least 15 minutes in the freezer, the ice cream cake is ready for a second coat of frosting. Once you’ve got a smooth finish, return the cake to the freezer for at least another 15 minutes.
Chill Cake Thoroughly: Once the ice cream cake is fully assembled, it’s important to chill it for AT LEAST an hour. In fact, the longer it chills, the better! This final chill will give it time to firm up, so the cake doesn’t smash when you slice into it.
Use a Sharp HOT Knife: When it comes time to cut into your gorgeous cake, make sure to use a sharp knife and run it under hot water. It also makes it much easier to cut into the cake without ruining any of the layers.
How deep do my 6-inch cake pans need to be?
As I mentioned earlier, I used one 3-inch deep pan and a 2-inch deep pan. These two pans together were just tall enough to hold all of the layers, so I’d make sure you had at least 5 inches in depth total between the two cake pans you use.
Can I use 8-inch cake pans instead?
If you don’t have 6-inch pans, you can definitely use 8-inch cake pans. The cake will just be wider rather than tall.
How do I toast the mini marshmallows to put on top?
You can scatter some on a baking sheet and place them under the broiler for a few seconds–this doesn’t take long! Or you can do what I did and scatter some on a baking sheet and use a small kitchen torch to toast them.

S'more Ice Cream Cake
Ingredients
Graham Cracker Crust:
- 1 ⅓ cups crushed graham cracker crumbs (about 10 crackers)
- 3 Tablespoons brown sugar
- 5 Tablespoons butter, melted
- ½ teaspoon cinnamon
Fudge Sauce:
- 1 cup semi-sweet chocolate chips
- 4 Tablespoons corn syrup
- ½ cup heavy cream
Toasted Marshmallow and Milk Chocolate Ice Creams:
- 18 regular marshmallows (about 4 ounces)
- 1 (14 oz) can sweetened condensed milk, divided
- 2 cups heavy cream
- 3 ounces milk chocolate
- 2 teaspoons unsweetened cocoa powder
Chocolate Whipped Cream Frosting:
- ⅓ cup powdered sugar
- 3 Tablespoons unsweetened cocoa powder
- 2 cups heavy cream
- 1 teaspoon vanilla
To Decorate:
- Milk chocolate pieces
- Graham crackers
- Toasted mini marshmallows
Instructions
Make the Crust:
- Line a deep 6-inch springform pan* with plastic wrap. Combine the graham cracker crumbs, brown sugar, melted butter, and cinnamon in a medium bowl. Press half of the mixture into the bottom of the pan.
Make the Fudge Sauce:
- Place the chocolate chips and corn syrup into a medium bowl. Pour heavy cream into a glass measuring cup and heat in the microwave until it begins to simmer. Check it every 15-30 seconds so that it doesn't bubble over.
- Pour hot cream over the chocolate chips, and allow to sit for a few minutes. Stir until completely smooth.
- Pour half of the fudge sauce over the graham cracker crust, and chill crust in the freezer for at least 30 minutes.
Make the Ice Creams:
- Preheat your broiler and arrange marshmallows evenly on a baking sheet. Toast marshmallows until they've browned to your preference. Watch them closely as they can go from nicely browned to black and burnt really quickly. Remove marshmallows from the oven.
- Pour 7 ounces of the sweetened condensed milk into a food processor. Add the toasted marshmallows, and pulse until mixture is smooth and all of the marshmallows are broken up. This can also be done in a blender too; set aside.
- In a medium bowl, heat the milk chocolate in the microwave until melted. Add the remaining 7 ounces of sweetened condensed milk and cocoa powder to the melted chocolate, and stir until completely smooth; set aside.
- In the chilled bowl of a stand mixer fitted with the whisk attachment, whip the heavy cream until stiff peaks form.
- Fold a cup of the whipped cream into the marshmallow mixture to lighten it up. Fold a cup of the whipped cream into the chocolate mixture. Divide the rest of the whipped cream evenly among the marshmallow mixture and the chocolate mixture. Fold until just combined.
Assemble the Cake:
- Pour the marshmallow ice cream into the pan (on top of the fudge layer), using an offset spatula or butterknife to smooth out the top. Evenly sprinkle the rest of the graham cracker crumbs over the marshmallow ice cream. Spread the rest of the fudge sauce on top of the graham cracker layer. Chill in the freezer for at least 4 hours.
- Line another 6-inch pan with plastic wrap. Pour the milk chocolate ice cream into the pan, and use an offset spatula or butterknife to spread it out evenly. Chill in the oven for at least 4 hours.
Finish Assembling the Cake:
- Using the plastic wrap, lift the the marshmallow ice cream layer out of the cake pan, unwrap it, and place it onto a serving plate (graham cracker side on bottom). Repeat this step with the chocolate ice cream layer, and place it on top of the marshmallow ice cream layer. Chill in the freezer while you make the chocolate whipped cream.
Make the Chocolate Whipped Cream:
- Add the powdered sugar to a medium bowl. Sift the cocoa powder on top of the powdered sugar, then use a fork to stir it together; set aside.
- In the chilled bowl of a stand mixer fitted with a whisk attachment, beat the heavy cream until soft peaks form. Add the vanilla and powdered sugar-cocoa mixture, and continue beating until stiff peaks form.
Decorate the Cake:
- Frost the cake with a thin layer of chocolate whipped cream--this will act as the crumb coat. Be sure to work quickly so that the ice cream doesn’t melt. Place cake back into freezer for at least 15 minutes to firm up. Remove cake from the freezer and frost with a second and final layer of chocolate whipped cream. Return cake to the freezer.
- Transfer the rest of the chocolate whipped cream to a piping bag fitted with a large star tip. Pipe a border along the top of the cake. Garnish with milk chocolate, graham crackers, and toasted marshmallows.